Appendix: 3D Sketches
1
Appendix: Sketching Planes and Conics in the XYZ Coordinate System
Some mathematicians draw horrible sketches of 3–dimensional objects and they still lead productive, happy
lives. Some mathematics students are terrible 3D artists and still get A grades. But it really takes very
little time and practice to do decent sketches of planes and conic sections in 3D, and it can be satisfying to
have the curve you know is an ellipse actually look like an ellipse. This Appendix illustrates some step–by–step
ways to draw the basic building blocks for many 3D shapes: the axis system, planes and conic sections.
First Step: Invest in a pencil and a small, inexpensive, clear plastic
30 ! 60 ! 90 o triangle with a centimeter scale (Fig. 1). They make it much easier
to create good 3D sketches. Many of the directions in this Appendix suggest
drawing "help lines" to assist you in putting the various objects in the
appropriate positions and orientations. The final drawings often look better if these "help lines" are
removed when the sketch is finished, so a pencil is better than a pen. Many of the directions require you to
draw lines parallel to the axes and to draw parallelograms, and a clear plastic straightedge (or a triangle) is
very useful for this. Finally, the centimeter scale produces small sketches appropriate for personal work.
The following directions are for "by hand" sketches, but they
can also help you when using CAD (computer–aided design)
and Draw computer programs.
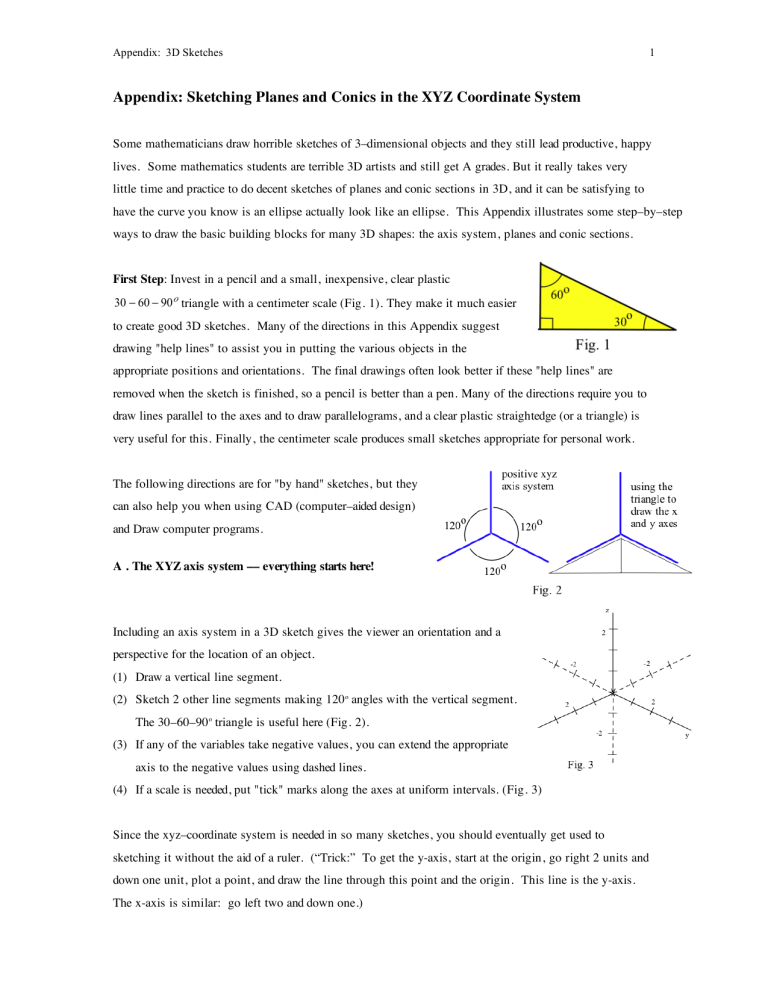
A . The XYZ axis system –– everything starts here!
Including an axis system in a 3D sketch gives the viewer an orientation and a
perspective for the location of an object.
(1) Draw a vertical line segment.
(2) Sketch 2 other line segments making 120 o angles with the vertical segment.
The 30–60–90 o triangle is useful here (Fig. 2).
(3) If any of the variables take negative values, you can extend the appropriate
axis to the negative values using dashed lines.
(4) If a scale is needed, put "tick" marks along the axes at uniform intervals. (Fig. 3)
Since the xyz–coordinate system is needed in so many sketches, you should eventually get used to
sketching it without the aid of a ruler. (“Trick:” To get the y-axis, start at the origin, go right 2 units and
down one unit, plot a point, and draw the line through this point and the origin. This line is the y-axis.
The x-axis is similar: go left two and down one.)
Appendix: 3D Sketches
B . The XY, XZ, and YZ coordinate planes. (Actually, rectangular pieces of the coordinate planes.)
The following rectangular pieces of the coordinate planes are useful by themselves, and they are very
important aids for drawing curves and conics later.
Keys: Start with an xyz–axis system. Use lines parallel to each axis.
The result should be a parallelogram.
Piece of the XY coordinate plane: (Fig. 4)
(1) Pick a point on the x–axis and draw a line segment to the
left of and parallel to the y–axis.
(2) From the end of the segment in step (1), draw a line to
the y–axis that is parallel to the x–axis.
Piece of the XZ coordinate plane: (Fig. 5)
(1) Pick a point on the x–axis and draw a vertical line segment (up and
parallel to the z–axis).
(2) From the end of the segment in step (1), draw a line to
the z–axis that is parallel to the x–axis.
Plane (piece) parallel to the xy–plane: (Fig. 6)
(1) Locate and label the appropriate point on the z–axis, for example, z = 2.
(2) From the point in step (1), draw line segments parallel to the
x–axis and the y–axis.
(3) From the ends of the segments in step (2), draw additional lines parallel
to the y–axis and the x–axis to complete the parallelogram.
Plane (piece) parallel to the xz–plane: (Fig. 7)
(1) Locate and label the appropriate point on the y–axis, for example, y = 2.
(2) From the point in step (1), draw line segments parallel to the x–axis
and the z–axis.
(3) From the ends of the segments in step (2), draw additional lines
parallel to the z–axis and the x–axis to complete the parallelogram.
2
Appendix: 3D Sketches
3
Practice 1: Sketch the planes z = 1 and x = 2 in Fig. 8.
Practice 2: Sketch the planes z = –1 and y = 1 on an XYZ system.
Practice 3: Sketch the rectangular box with opposite corners at
(0, 0, 0) and (4, 3, 2).
Challenge 1: Sketch the plane that contains the points
(0, 0, 3), (4, 0, 3), and (0, 2, 3).
C . Ellipses
Keys: Plot the vertices and make a parallelogram "frame" for the ellipse. Sketch short tangent
segments at the midpoints of the sides of the parallelogram.
Example 1: An ellipse in the xy–plane with vertices at (3,0,0), (–3,0,0), (0,2,0), and (0,–2,0). (Fig. 9)
(1) Plot the vertices in the xy–plane (z=0).
(2) Sketch a parallelogram "frame" by drawing lines through (3,0) and (–3,0) that are parallel to the y–axis,
and lines through (0,2) and (0,–2) that are parallel to the x–axis.
(3) At each vertex sketch a short "tangent segment" that lies on the side of the parallelogram frame.
(4) Finish the sketch by smoothly connecting the "tangent segments."
If your sketch requires several conics, it is useful to erase all or most of the parallelogram frame.
Appendix: 3D Sketches
Example 2: An ellipse in the
xz–plane with vertices at (2,0,0),
(–2,0,0), (0,0,1), and (0,0,–1). Fig. 10
shows the intermediate steps to construct
this ellipse as well as the final result.
Practice 4: Sketch the ellipse with vertices at
(1, 0, 0), (-1, 0, 0), (0, 0, 2), and (0, 0, –2)
on the XYZ system in Fig. 11.
Practice 5: Sketch the ellipse with vertices at (3, 0, 2), (–3, 0, 2),
(0, 1, 2), and (0, –1, 2) .
y2
+ z2 =1 .
9
Challenge 2: Sketch the ellipse with vertices at (4,2,0), (2,0,3),
Practice 6: Sketch the elliptical cylinder
(0,2,6), and (2,4,3).
D . Parabolas
Keys: Plot the vertex and one other point on the parabola. Make a parallelogram "frame" for the
parabola and plot a symmetric point. Sketch short "tangent segments" at the plotted points.
Example 3: Sketch the parabola lying in the xy-plane that satisfies y = x 2 ! 4 x + 6 . (Fig. 12)
(1) Plot the vertex (2,1,0). When x = 1, then y = (1)2 – 4(1) + 6 = 3. Plot (1,3,0).
(2) Sketch a parallelogram "frame" by drawing lines through (2,1,0) parallel to the x–axis and the
y–axis, and through (1,3,0) parallel to the x–axis and the y–axis.
(3) Plot the "symmetric point" (3,3,0) and draw a line through it parallel to the x–axis and the y–axis.
(4) Sketch a short "tangent segment" at the vertex (2,1,0) (this "tangent segment" lies on the side
of the parallelogram). Add "tangent segments" at the other two plotted points (1,3,0) and (3,3,0)
(these "tangent segments are not parallel to the sides of the parallelogram).
(5) Finish the sketch by smoothly connecting the "tangent segments."
4
Appendix: 3D Sketches
Example 4: Sketch the parabola lying in the xz-plane that
2
satisfies z = x + 1.
Fig. 13 shows a beginning step and the final result.
Practice 7: Sketch the parabola with vertex at (0,2,0) that
contains the point (0,1,2) on the XYZ system in Fig. 14.
Practice 8: Sketch the parabola with vertex at (2,0,2) that contains
the point (0,0,0) .
Practice 9: Sketch the parabola x = (y – 1) 2 on the plane z = 1.
Challenge 3: Sketch the parabola with vertex (4,2,0) that contains
the symmetric points (0,1,3) and (0,3,3).
E . General curves in coordinate planes
Keys: Start with a regular rectangular coordinate graph of the function and a few "tangent segments." Plot
a domain–range parallelogram in 3D along with the points and the "tangent segments."
Example 5: Sketch the curve y = sin(x), 0 ≤ x ≤ 3π, in the xy–plane. (Fig. 15)
(1) Graph y = sin(x), 0 ≤ x ≤ 3π, in the 2D rectangular coordinate system,
label a few points and add "tangent segments" at those points.
(2) Sketch the domain–range parallelogram, 0 ≤ x ≤ 3π and –1 ≤ y ≤ 1.
(3) Sketch the points and "tangent segments" in the parallelogram in step (2).
(4) Finish the sketch by smoothly connecting the "tangent segments."
5
Appendix: 3D Sketches
Practice 10: On the XYZ system in Fig. 16 sketch a curve
(a) in the xz-plane (y=0) that satisfies z = 1 + cos(x), –π ≤ x ≤ 3π,
(b) in the y = 2 plane that satisfies z = 1 + cos(x), –π ≤ x ≤ 3π,.
Practice 11: On an XYZ system sketch the curve (a) in the
yz-plane (x=0) that satisfies z = y for 0 ≤ y ≤ 4, (b) in the x = 2
plane that satisfies z = y for 0 ≤ y ≤ 4.
Practice 12: Sketch the curve y = 4 ! x 2 , –2 ≤ x ≤ 3 (a) in the xy–plane and (b) in the z = 3 plane.
Challenge 4: Sketch the graph of z = | x | + | y | on the plane {y = –x, no restrictions on z} .
Final Note
Sketching 3D curves on a 2D piece of paper presents challenges for most of us, but with a bit of practice
(and a systematic approach) most of us can learn to do decent sketches of a some simple 3D curves. It
certainly helps if the curve lies in a plane.
6

