PHOTOCELLS MF101
реклама
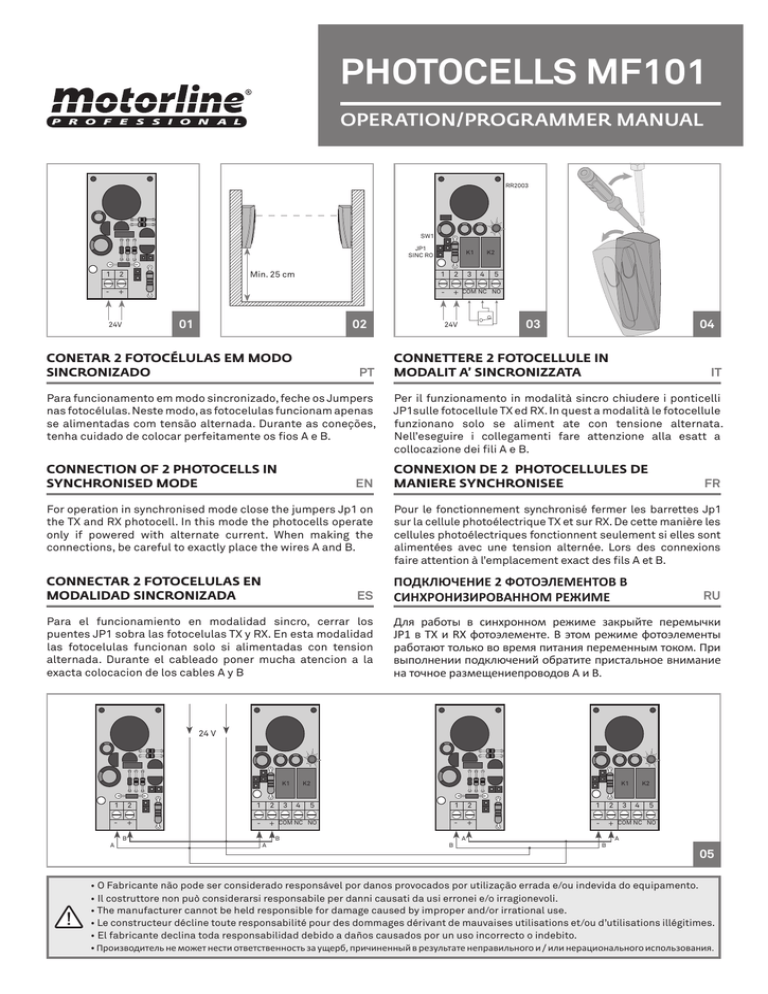
PHOTOCELLS MF101 OPERATION/PROGRAMMER MANUAL RR2003 SW1 JP1 SINC RO 1 2 - + Min. 25 cm 01 24V 02 CONETAR 2 FOTOCÉLULAS EM MODO SINCRONIZADO PT K1 3 K2 1 2 4 5 - + COM NC NO 03 24V 04 CONNETTERE 2 FOTOCELLULE IN MODALIT A’ SINCRONIZZATA IT Para funcionamento em modo sincronizado, feche os Jumpers nas fotocélulas. Neste modo, as fotocelulas funcionam apenas se alimentadas com tensão alternada. Durante as coneções, tenha cuidado de colocar perfeitamente os fios A e B. Per il funzionamento in modalità sincro chiudere i ponticelli JP1sulle fotocellule TX ed RX. In quest a modalità le fotocellule funzionano solo se aliment ate con tensione alternata. Nell’eseguire i collegamenti fare attenzione alla esatt a collocazione dei fili A e B. CONNECTION OF 2 PHOTOCELLS IN SYNCHRONISED MODE CONNEXION DE 2 PHOTOCELLULES DE MANIERE SYNCHRONISEE EN FR For operation in synchronised mode close the jumpers Jp1 on the TX and RX photocell. In this mode the photocells operate only if powered with alternate current. When making the connections, be careful to exactly place the wires A and B. Pour le fonctionnement synchronisé fermer les barrettes Jp1 sur la cellule photoélectrique TX et sur RX. De cette manière les cellules photoélectriques fonctionnent seulement si elles sont alimentées avec une tension alternée. Lors des connexions faire attention à l’emplacement exact des fils A et B. CONNECTAR 2 FOTOCELULAS EN MODALIDAD SINCRONIZADA ПОДКЛЮЧЕНИЕ 2 ФОТОЭЛЕМЕНТОВ В СИНХРОНИЗИРОВАННОМ РЕЖИМЕ ES Para el funcionamiento en modalidad sincro, cerrar los puentes JP1 sobra las fotocelulas TX y RX. En esta modalidad las fotocelulas funcionan solo si alimentadas con tension alternada. Durante el cableado poner mucha atencion a la exacta colocacion de los cables A y B RU Для работы в синхронном режиме закрыйте перемычки JP1 в TX и RX фотоэлементе. В этом режиме фотоэлементы работают только во время питания переменным током. При выполнении подключений обратите пристальное внимание на точное размещениепроводов А и В. 24 V K1 1 2 1 2 - + - + COM NC NO A B A 3 K2 B 4 K1 5 B 1 2 1 2 - + - + COM NC NO A B 3 K2 4 5 A 05 • O Fabricante não pode ser considerado responsável por danos provocados por utilização errada e/ou indevida do equipamento. • Il costruttore non può considerarsi responsabile per danni causati da usi erronei e/o irragionevoli. • The manufacturer cannot be held responsible for damage caused by improper and/or irrational use. • Le constructeur décline toute responsabilité pour des dommages dérivant de mauvaises utilisations et/ou d’utilisations illégitimes. • El fabricante declina toda responsabilidad debido a daños causados por un uso incorrecto o indebito. • Производитель не может нести ответственность за ущерб, причиненный в результате неправильного и / или нерационального использования. INSTALAÇÃO PT CARACTERISTICAS TÉCNICAS 1• Para abrir as fotocélulas, utilize uma chave de fendas (como indicado na figura 4) e rode. Insira os cabos no local correcto e fixe a a base à parede (figura 2). Se a fotocélula for colocada na parede, faça os três furos de 5ø e coloque as buchas. Se a fotocélula for colocada em metal, faça os três furos de 3ø e coloque parafusos autorroscantes. 2• Faça as coneções como indicado na figura 1 (TX) e na figura 3 (RX). Fixe as fotocélulas em posição frontal, alinhadas no mesmo eixo e à mesma altura (min. 25 cm) como na figura 2. 3• Alimente as fotocélulas com corrente e tensão de 12 ou 24 V AC-DC (em caso de 12V, feche a ponte Sw1). Se o posicionamento, alinhamento e coneção for feita corretamente, o LED vermelho no receptor irá apagar. De cada vez que o raio seja interrompido, o LED vermelho acenderá. 4• Cubra a fotocélula com o painel frontal. 5• Interrompa o raio várias vezes e verifique a resposta do relé. INSTALLAZIONE EN 1• To open the photocell, place the screwdriver as indicated in pic. 4 and rotate. Insert the cables in their housing and fix the base to the wall (pic. 2). If the photocell has to be mounted on a wall, drill the three 5 ø holes and fit suitable screw anchors. If the photocell has to be mounted on metal, drill the three 3 ø holes for fitting with the self tapping screws. 2• Make the connections as in Fig. 1 (TX) and Fig. 3 (RX). Fix the two photocells in front al position, aligned on the same axis and at the same height (min. 25 cm) as in Fig. 2. 3• Power the photocells with power suppy with tension 12 or 24 V AC-DC (in case of12V close bridge Sw1). If positioning, alignment and connection have been carried out properly , the red LED on the receiver will be off. Each time the ray is interrupted, the red LED switches on. 4• Cover the photocell with the front panel. Insert to the stop and close it. 5• Interrupt the ray several times checking the relay response. INSTALLATION FR 1• Per aprire le fotocellule, utilizzare un cacciavite e ruotare come in fig. 4. Infilare i cavi nel l’apposita sede e fissare la basetta alla parete (Fig. 2). Se si deve fissare la fotocellula al muro, effettuare i tre fori ø 5 ed innestare tasselli adeguati. Se si deve fissare la fotocellula su metallo, effettuare i tre fori ø 3 per predisporre l’utilizzo delle sole viti autofilettanti. 2• Effettuare i coallegamenti come in Fig. 1 (TX) Fig. 3 (RX). Fissare le fotocellule in posizione frontale, allineati sullo stesso asse e la stessa altezza (min. 25 cm) come in figura 2. 3• Alimentarle con tensione 12 o 24 V CA-CC (se 12V chiudere ponticello Sw1). Se il posizionamento, l’allineamento ed il collegamento sono eseguiti correttamente, il LED rosso sul ricevitore sarà spento. Ogni qualvolta si interrompe il raggio, il LED rosso si accende. 4• Coprire la fotocellula con il frontale.Inserire a battuta e chiudere agganciando dall’alto verso il basso. 5• Interrompere il raggio più volte verificando la risposta del relè. INSTALACIÓN ES 1• Para abrir las fotocelulas utilizar un destornillador y rodar como en fig. 4. Introducir los cables en la especifica sede y fijar la base a la pared (Fig. 2). En caso de fijarse la fotocélula en la pared, practicar los tres agujeros ø 5 e introducir tacos adecuados. Si se debe fijar la fotocélula sobre metal, practicar los tres agujeros ø 3 para predisponer el uso de los tornillos autorroscantes. 2• Efectuar las conexiones de la manera ilustrada en Fig. 1 (TX) Fig. 3 (RX). Fijar las fotocélulas en posición frontal, alineados en el mismo eje y a la misma altura (min. 25 cm) (Fig. 2). 3• Alimentar con tensión de 12 o 24V CA-CC (en caso of 12V cierre el puente SW1). Si la coloración, ineación y conexión se efectúan de modo correcto, el LED rojo en el receptor permanece apagado. Cada vez que se interrumpe el rayo, el LED rojo se enciende. 4• Cubrir la fotocélula con su elemento frontal. 5• Interrumpir el rayo varias veces verificando la respuesta del relé. УСТАНОВКА 12/24V cc/ca • Absorção 60 mA • Comprimento de Onda IV 880 nm • Temp. de funcionamento -20 a +60°C • Capacidade Relé 1A - 24V • Frequência de modulação 1500 Hz IT CARATTERISTICHE TECNICHE 1• Per aprire le fotocellule, utilizzare un cacciavite e ruotare come in fig. 4 . Infilare i cavi nel l’apposita sede e fissare la basetta alla parete (Fig. 2). Se si deve fissare la fotocellula al muro, effettuare i tre fori ø 5 ed innestare tasselli adeguati. Se si deve fissare la fotocellula su metallo, effettuare i tre fori ø 3 per predisporre l’utilizzo delle sole viti autofilettanti. 2• Effettuare i coallegamenti come in Fig. 1 (TX) Fig. 3 (RX). Fissare le fotocellule in posizione frontale, allineati sullo stesso asse e la stessa altezza (min. 25 cm) come in figura 2. 3• Alimentarle con tensione 12 o 24 V CA-CC (se 12V chiudere ponticello Sw1). Se il posizionamento, l’allineamento ed il collegamento sono eseguiti correttamente, il LED rosso sul ricevitore sarà spento. Ogni qualvolta si interrompe il raggio, il LED rosso si accende. 4• Coprire la fotocellula con il frontale.Inserire a battuta e chiudere agganciando dall’alto verso il basso. 5• Interrompere il raggio più volte verificando la risposta del relè. INSTALLATION • Alimentação PT RU 1• Чтобы открыть фотоэлемент, нужно использовать отвертку, как показано на рисунке 4, и вращать. Вставьте кабели в разъем и закрепите основание к стене (рис. 2). Если фотоэлемент был установлен на стене, просверлите три отверстия 5 ø и установите подходящие дюбеля. Если фотоэлемент был установлен на металле, просверлите три отверстия 3 ø для установки с саморезами. 2• Выполните подключения, как показано на рис. 1 (TX) и рис. 3 (RX). Закрепите два фотоэлемента в фронтальной позиции, выровняв по одной оси и на той же высоте (мин. 25 см), как на рис. 2. 3• Мощность фотоэлементов с блоком питания с напряжением 12 или 24 V AC /DC. Если позиционирование, выравнивание и подключение были проведены должным образом, красный светодиод на приемнике будет выключен. Каждый раз, когда луч прерывается, загорается красный светодиод. 4• Крышка фотоэлемента на передней панели, вставьте ее до упора и закройте. 5• Прервите луч несколько раз, чтобы проверить реакцию реле. • Alimentazione IT 12/24V cc/ca • Assorbimento 60 mA • Lunghezza d’onda I.R. 880 nm • Temp. di funzionamento -20 a +60°C • Portata relè 1A - 24V • Frequenza di modulazione 1500 Hz TECHNICAL CHARACTERISTICS • Power supply 12/24V cc/ca • Absorption 60 mA • IR wave length • Operating temperature 880 nm -20 to +60°C • Relay capacity 1A - 24V • Modulation frequency 1500 Hz SPÉCIFICATIONS TECHNIQUES • Alimentation 60 mA • Longueur d’onde I.R. 880 nm -20 a +60°C • Calibre du relais 1A - 24V • Fréquence de modulation 1500 Hz ES CARACTERÍSTICAS TÉCNICAS • Alimentación 12/24V cc/ca • Consumo • Longitud de onda I.R • Temperatura funcionamiento 60 mA 880 nm -20 a +60°C • Capacidad relé 1A - 24V • Frequencia de modulación 1500 Hz RU ТЕХНИЧЕСКИЕ ХАРАКТЕРИСТИКИ • Напряжение питания 12/24V cc/ca • Абсорбция 60 mA • Длина волны IR 880 nm • Рабочая температура FR 12/24V cc/ca • Absorption • Température d’emploi EN -20 до +60°C • Реле мощности 1A - 24V • Частотная модуляция 1500 Hz
