Узел защиты УМ и акустики от перегрузок по току
реклама
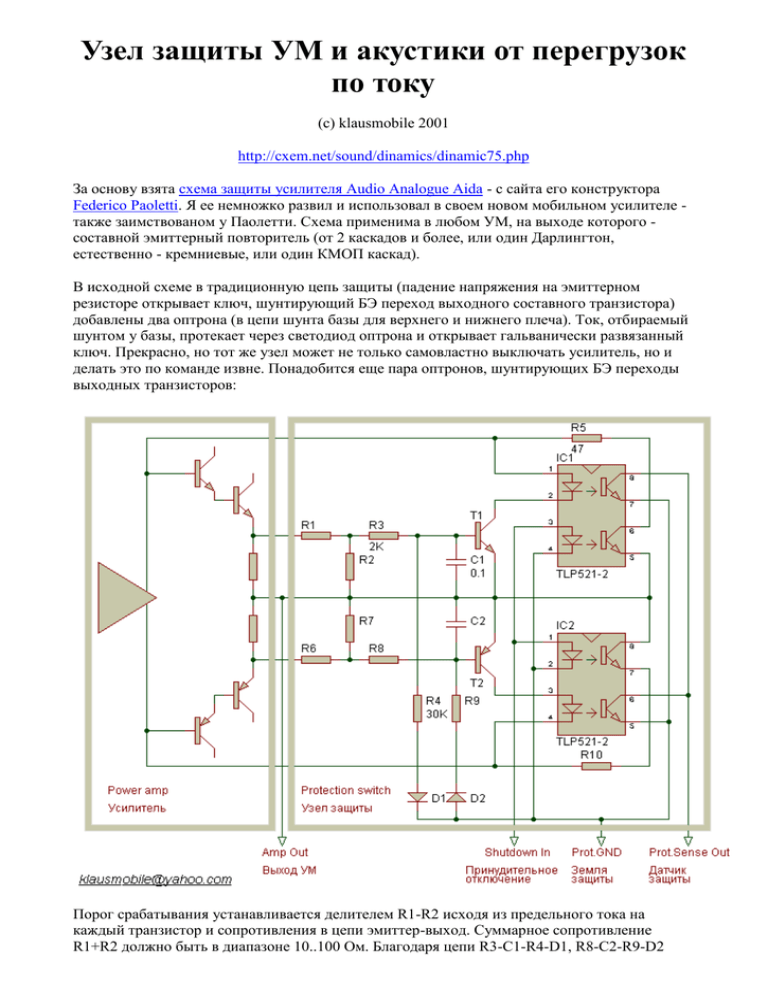
Узел защиты УМ и акустики от перегрузок по току (c) klausmobile 2001 http://cxem.net/sound/dinamics/dinamic75.php За основу взята схема защиты усилителя Audio Analogue Aida - с сайта его конструктора Federico Paoletti. Я ее немножко развил и использовал в своем новом мобильном усилителе также заимствованом у Паолетти. Схема применима в любом УМ, на выходе которого составной эмиттерный повторитель (от 2 каскадов и более, или один Дарлингтон, естественно - кремниевые, или один КМОП каскад). В исходной схеме в традиционную цепь защиты (падение напряжения на эмиттерном резисторе открывает ключ, шунтирующий БЭ переход выходного составного транзистора) добавлены два оптрона (в цепи шунта базы для верхнего и нижнего плеча). Ток, отбираемый шунтом у базы, протекает через светодиод оптрона и открывает гальванически развязанный ключ. Прекрасно, но тот же узел может не только самовластно выключать усилитель, но и делать это по команде извне. Понадобится еще пара оптронов, шунтирующих БЭ переходы выходных транзисторов: Порог срабатывания устанавливается делителем R1-R2 исходя из предельного тока на каждый транзистор и сопротивления в цепи эмиттер-выход. Суммарное сопротивление R1+R2 должно быть в диапазоне 10..100 Ом. Благодаря цепи R3-C1-R4-D1, R8-C2-R9-D2 (ФНЧ) порог срабатывания по постоянному току намного выше чем на ЗЧ. Кроме того, порог падает при росте температуры Т1, Т2. Первый и четвертый (по вертикали) оптроны - датчики защиты (замкнуто=авария), второй и третий - ключи, управляемые внешним сигналом (втекающий ток = выключение УМ). В цепи принудительного выключения обязательно предусмотреть токоограничительный резистор. Резисторы R9-10 - я поставил вместо перемычек на плате, нужны ли они как таковые - наверное, нет. Несмотря на добавочное падение напряжения на светодиоде, схема гарантированно выключает УМ с повторителем на одиночных и сдвоенных Дарлингтонах (0.33 Ома под эмиттером). Главное, чтобы ток, отбираемый T1, T2 у "треугольника" - усилителя напряжения - был достаточен для гарантированного включения оптронов (не менее 1 мА для TLP521). Оптроны - любые кроме Дарлингтонов (ну их к лешему, да и не нужно здесь большое усиление). Требуемый коэффициент передачи тока определяется токами и уровнями автоматики защиты, а также током, который шунт должен отобрать от "треугольника". Т1, Т2 - любые маломощные с низким напряжением насыщения. Кстати, заученные наизусть полтора вольта на светодиоде - не совсем верно. На светодиоде TLP521 в этой схеме падает при комнатной температуре не более 0.9В . При проектировании платы сначала "по уму" размещаем собственно УМ, а цепь защиты - во вторую очередь. При этом "землю" защиты провести отдельно и соединить с прочими "землями" в общей точке "звезды". Если в автомобильном усилителе аналоговая земля развязана по току от бортовой земли, а блок автоматики как правило сидит на бортовой, то цепи R4D1 R9D2 соединить с силовой аналоговой, а землю отпронов - с бортовой. Бесконтактная защита громкоговорителей Большинство современных усилителей мощности звуковой частоты (УМЗЧ) построены без разделительных конденсаторов на выходе. При неисправности усилителя появление постоянного напряжения на выходе УМЗЧ может привести к повреждению дорогостоящих динамиков акустической системы. Для их защиты от постоянного напряжения любой полярности предлагаю несложное устройство (рис.1). В качестве прототипа взята схема устройства защиты усилителя "405" ф."Quad", но приняты меры по предотвращению самопроизвольного открывания симистора при высокой скорости нарастания выходного напряжения, которая бывает в современных УМЗЧ. Дополнительно введена световая индикация перегорания предохранителя на мигающем светодиоде при срабатывании защиты. Рис.1. Принципиальная схема устройства защиты громкоговорителей При появлении на выходе УМЗЧ постоянного напряжения любой полярности более 3...4 В, резко возрастает напряжение на выводах конденсаторов С2, СЗ. Ток, протекающий через резистор R4, один из диодов VD5, VD6 и один из транзисторов VT1, VT2, открывает симистор VS1. Открытый симистор шунтирует выход УМЗЧ до момента перегорания предохранителя FU1. При его перегорании начинает мигать светодиод HL1. Элементы С1, L1 предназначены для предотвращения несанкционированного открывания симистора из-за помех. Предохранитель выбирается исходя из максимальной выходной мощности усилителя и сопротивления акустической системы. В устройстве можно использовать резисторы типов С1-4, С2-23, МЛТ и другие соответствующей мощности. Конденсатор С1 — керамический, типов К10-7, К10-17, КМ-5. Оксидные конденсаторы С2, СЗ — типа К50-16, К50-35. Оба эти конденсатора можно заменить одним неполярным, при этом диоды VD7, VD8 из схемы исключаются. Диоды КД521А можно заменить на КД102 (А, Б), КД103 (А, Б), КД518А, 1N4148. Светодиод HL1 может быть как мигающим, так и постоянного свечения, например, АЛ307, КИПД35, КИПД40. Транзистор VT1 можно заменить на КТ503Е, КТ602, КТ683, MPSA-43, 2N5550. VT2 заменяется КТ502Е или любым p-n-р транзистором из серий КТ6116, КТ668, 2SA709, 2SA910, MPSA-93. В качестве симистора VS1 подойдет КУ208 с индексами Г, Д или ТС11210, ТС112-16 и другие на рабочее напряжение не менее 100 В. Дроссель L1 наматывается проводом ПЭВ-2 00,68 мм — 75 витков на каркасе из плотной бумаги с внешним диаметром 10 мм. Для проверки собранного узла плавкий предохранитель временно заменяется лампой накаливания на напряжение 6...12 В и ток 0,16...1 А. Узел подключается к выходу лабораторного блока питания с регулируемым выходным напряжением 2...10 В. Плавно увеличивая выходное напряжение, по моменту зажигания лампы определяется порог срабатывания защиты. Если он будет не более 4 В, то узел пригоден для совместного использования с автомобильными УМЗЧ. При указанной на схеме емкости конденсаторов С2, СЗ, задержка срабатывания защиты составит около 1 с. При необходимости время задержки можно уменьшить до 0,2...0,5 с, взяв эти конденсаторы меньшей емкости. Конструктивно этот блок может быть размещен как внутри УМЗЧ, так и в АС. В случае установки узла внутри акустической системы, если в АС есть наполнитель из горючего материала, например, вата, он не должен соприкасаться с деталями узла защиты. Для многоканального усилителя собирается соответствующее число блоков. Источники 1. Д.Атаев, В.Болотников. Функциональные узлы усилителей высококачественного звуковоспроизведения. — Радио и связь, 1989, С.111. Loudspeaker Protection and Muting http://www.sound.westhost.com/project33.htm Rod Elliott (ESP) Updated 22 July 2007 Share | Please Note: PCBs are available for the latest revision of this project. Click the image for details. Introduction Please note that the PCB version is different from the circuit shown in this article. It is actually simpler, but achieves the same functions. Full details are available when you purchase the board. The latest boards are Revision-A, and are slightly different from the previous version. Many hi-fi amplifiers and professional power amps (and loudspeaker systems) provide some of protection, either to protect the speakers from an amp fault, and/or vice versa. Some of these are implemented at a very basic level - for example the use of a 'poly-switch'. The poly-switch is a nonlinear resistor, having a low resistance at normal temperatures and a much higher resistance at some designated temperature. Unlike 'ordinary' thermistors whose characteristics are more or less linear, the poly switch has a rapid transition once the limit has been reached. I don't like poly-switches, because I know that the introduction of a non-linear element is going to add some degree of distortion, and because of a finite resistance, will degrade damping. This (i.e. damping) is not an issue IMHO, but to many audiophiles it is of prime importance. (I shall not pursue this argument here, however - see Impedance for more info.) The basic requirement of a speaker protector requires that any potentially dangerous DC flow to the speakers should be interrupted as quickly as possible. There are a few issues that need to be solved to ensure that this will happen fast enough to stop the loudspeaker drivers from being damaged, and this becomes more critical if a biamped (and even more so with triamped) system is being used. Naturally, one can simply rely on fuses. Although these also have finite resistance it is small, and use of fast blow fuses can be quite effective. The rating becomes quite critical, and fast blow types are essential. The problem with this approach is that if the fuse is of a suitable value to provide good protection, it will be subjected to considerable thermal stress since it is operating at close to its limits. Metal fatigue will create the problem of nuisance blowing, where the fuse blows simply because it is 'tired' of the constant flexing caused by temperature variations. This project explains the principles, and shows a suitable detection method that may be applied. The speed of the relay used is another critical factor, and we shall see that the conventional method of preventing the relay's back-emf from destroying the drive transistor also slows down the response to an unacceptable degree. The circuit also includes a mute function, which leaves the speakers disconnected until the amplifier has settled, and disconnects the speakers as quickly as possible after power is removed to prevent the turn-off noises that some amps generate. These can range from a low level thump 5 to 10 seconds after power is turned off, to whistles, squeaks and other strange noises that I have heard from amps over the years. Please Note: While the circuit shown here and the PCB version can both be made to work just fine with high supply voltages (such as ±70V as used with P101), be aware that the majority of relays will be totally incapable of breaking that voltage and the resulting current under fault conditions. The DC causes a significant arc, and this is more than capable of simply burning off the relay contacts. If you are lucky, the fuse(s) will blow before the relay is destroyed, but I wouldn't count on it. While relays capable of breaking perhaps 10A or more at 70V DC are available, they will be expensive, and probably hard to get. Unfortunately, there are few options for an alternative method. Using the relays as shown below (with the normally open contact connected to ground), the arc will be diverted from the speaker and will be to ground, but will almost certainly be destroyed unless a specialised component is used. Despite their apparent simplicity, relays are actually rather complex devices. A great deal of engineering goes into the development of the contacts, but operating them in excess of the manufacturer's ratings means that nothing is certain. Please make sure that you understand the limitations of any such circuit (not just mine - the same applies to all loudspeaker protection circuits). The circuits themselves are not limited, but the relays most certainly are. The Circuit It is important to identify the lowest frequency likely to be passed to a speaker, because this determines the delay that must be introduced to prevent low frequencies from triggering the protection circuit (nuisance tripping). For practical purposes, a low frequency limit of 20Hz is satisfactory for a full range system, and this means that a minimum 25ms delay is essential. In reality, due to the combination of low frequencies, and asymmetrical waveforms at higher frequencies, a greater delay will normally be required. Unfortunately, the greater the delay, the greater the risk of drivers being damaged. In a full range system (i.e. using passive crossovers), midrange and tweeters will be offered some protection by the capacitors used in the crossover network, but these are missing in a biamped or triamped system. For this reason, it is important that the circuit can be easily modified to change the initial time delay before the system detects the DC and disconnects the speakers. The Detector This is the most important of the functions. It must be capable of detecting a DC offset of either polarity, and be immune to the effects of asymmetrical waveforms and low frequencies. This is a common requirement, and it is most expedient to use a simple (single pole) filter to keep the complexity to a minimum. With this arrangement, a low frequency cut-off of about 1Hz is about right. Without boring you with the mathematics behind this, it works out (eventually) that a filter having a time constant of 1.0s will still provide the ability to detect high level DC reasonably quickly, but allow low frequencies through without triggering. With this, the relay could have its supply removed within about 50ms from the time the output voltage reaches the supply rail (this is supply voltage dependent) - due typically to a shorted transistor in the output stage. By changing the time constant of the filter, we can adapt the circuit for operation at other higher frequencies to suit a biamped (or triamped) system. The detector can be built using an opamp, and will work very well, but this introduces the need for low voltage supplies within the power amp. This is not always possible (or desirable), so the design uses discrete transistors throughout to allow for the different supply voltages found in typical power amplifiers. The detector circuit shown in Figure 1 (1) is simple and works well, and as shown will not trigger with a 30V RMS signal at 5Hz, but operates in 60ms with 30V DC applied, and in 50mS with a 45V DC supply. This should be sufficient for most applications, and allows the use of a nonpolarised electrolytic capacitor in the filter. These are cheap, small and quite adequate for this purpose. NOTE: The power supplies (+ve and -ve) shown in these diagrams will normally be the power amp supply rails. Do not try to substitute different supplies unless you know exactly what you are doing, or the circuit may not work properly. This is especially true of the muting circuit, but incorrect supplies will (may) also affect the DC detection circuit. Like most of my projects, this is intended for experienced constructors. Figure 1 - Basic DC Detector Circuit The input filter is a simple single pole (6dB/ octave) version, and although it would seem that a 'better' filter would be preferable, a two pole (or more) filter will actually degrade the DC detection. This basic circuit is not new (see reference), and has actually existed in one form or another for some time. It is ideally suited for our requirements, as it is symmetrical, and with the input diodes as shown, a single detector can be used with multiple amps and different input time constants for each individual filter. The unit itself can operate on a separate supply if desired, so the complete protection circuit can be in a separate enclosure. Regulated supplies are not needed, and no hum or other artefacts are introduced into the speaker lines. (Please see NOTE above.) The table (below) shows some suggested values for the filter, for use in bi- and tri-amped systems. You will need one filter and two diodes for each amplifier channel connected, and a suitable number of relay contacts to handle them all. In some cases, this will mean multiple relays. Frequency (Hz) C1 Value Full Range 10 uF (non-polarised) 100 Hz 1 uF 300 Hz 330 nF 1 kHz 100 nF 3 kHz 33 nF The resistor should be left at 100k for all frequencies. Do not use a conventional electrolytic capacitor for C1, because any small reverse bias will eventually ruin it. You may discover that with some types of music (especially if at high volume) may cause the circuit to false trigger. If this happens, increase the value of C1, up to a maximum of 47uF. Anything higher than this will slow down the response unacceptably. Relay Specifications The relays should be easy enough to obtain. At least one of the Australian component suppliers has relays that are quite suitable, but they are not particularly cheap. The current rating is very important, and assuming a supply voltage of +/- 40V, this will cause a current of about 6A in an 8 ohm speaker if a transistor shorts. Although 6A may not sound like much, it is at DC, and because there are no periods of 0V as with AC, the arc is longer, fatter, and far more destructive of contacts than the same current using AC. Do not be tempted to use miniature relays, because if the normal AC speaker signal is too far in excess of the relay contact rating, the contacts may become welded together - this will almost certainly happen if the DC rating is too low. You also need to consider that contact resistance is additional resistance in the speaker lead and may affect damping (albeit very marginally) and will introduce some small power loss, and the miniature types will not be suitable in this regard. I had a look in the catalogue of one Australian supplier, and they have several relays with a 10A contact rating. I would suggest that anything lower is unwise for long term reliability. Most of the commonly available relays will have a 12V coil, and this will cause problems if the supply voltage is 30V or more. Power relays often draw significant current (typically > 60mA), and it will usually be best to connect the coils in series. Be aware that in some areas there is significant sulphur content in the air, and this causes heavy tarnishing of silver contacts. If you live in such an area, it would be advisable to obtain hermetically sealed relays if possible, to prevent the contacts from tarnishing. It is well known that the current required to activate a relay is far greater than that needed to keep the contacts closed, and a common trick is to use an 'efficiency' circuit to minimise the relay holding current. I do not feel that the additional complexity is warranted, and have not included this facility. If you really want to do this properly, see reference 1 (below). It has been claimed that an efficiency circuit also speeds up relay drop-out time because of the lower stored magnetic field. I conducted some tests, and the savings are marginal at best, although this could be different with different relays. Figure 2 shows the relay activation circuit, and includes the connection for the mute and protection signals. No components are critical, but some will need to be modified based on the relays used. I have assumed that a minimum of two relays will be needed (one for each channel), and this increases the total relay coil voltage to 24V. If you are going to use more than two (for example, four single pole relays are needed for a biamped system), then if the supply voltage is 48V or more, all 4 relays can be connected in series. In most cases you will need to work out the value of a suitable dropping resistor from the formula below. The terminal labelled "Off" is common to all three modules, and these points are simply joined together, as are the +ve and -ve supply connections. A positive current into the Off terminal will deenergise the relays, by turning on Q1. This steals all the base current for Q2, which then turns off, as does Q3. Figure 2 - Relay Activation Circuit R7 and D6 are optional. A reader used this circuit on a P68 subwoofer amplifier, and found that the circuit occasionally false-triggered. It was finally discovered that with some signals, the supply collapsed enough to re-start the mute timer. By adding the resistor and zener, this is avoided. R7 and D6 won't normally be needed, but if you get false triggering they will have to be added. To leave this section out simply means that D6 is not installed, and R7 is replaced by a link. The value for R7 (if needed) is determined by the supply voltage. The mute circuit draws very little current, so R7 can be calculated by ... VR7 = Vsupply - 24 (where 24 is the zener voltage) R7 can then be calculated, based on a zener current of 10mA ... R7 = VR7 / 0.01 (Ohms) P = VR7² / R7 (Watts) For example, with a 56V supply, R7 would be 3.2k, and will dissipate 0.32W (a 1W resistor is recommended). The relays must be turned off in the shortest possible time, so the use of the normal protection diode across the coil should not be used, as it slows the response considerably. Instead, the arrangement shown still protects the driver transistor, but allows the relay magnetic field to collapse without generating a current in the coil (this the what slows the relay's release). I cannot predict the exact delay you will achieve, since the choice of a suitable relay is outside my control. You will have to pester and annoy your local suppliers to find a relay that has suitable characteristics, and be prepared to pay what will seem like an obscene amount of money for a simple electro-mechanical device. D5 discharges C1 as the supply collapses. It will not help much in the case where someone switches the power off then straight back on (not that anyone would do that !), but will reset the circuit much faster than would otherwise be the case. The DC arc can (and does) destroy even 10A relays under some circumstances. To provide greater speaker protection, the relay wiring in Figure 2 is designed to short the speaker to earth in case of a fault. This way, even if the contacts do arc it will be directly to earth. This is much safer (for the speakers), and the arc to earth will blow the fuse a lot faster than if an 8 ohm load is a part of the circuit. It is strongly recommended that this scheme is used as a matter of course. It is worth noting that any DC protection system that does not use this method will almost certainly fail to protect the speakers with a medium to high powered amplifier. (My thanks to Phil Allison for the information.) Note also that this circuit cannot be used as shown with the 12V relays in series if the supply voltage is less than +/-24V (but you knew that already ) In order to work out the value of R6, subtract the combined relay voltage from the supply voltage (you must know the relay coil current!). To calculate the coil current from its resistance, use the following (I have assumed a 40V supply for the examples): I=V/R Where V = coil voltage and R = coil resistance So for a 180 ohm coil (fairly typical) this works out to I = 12 / 180 = 67mA The resistor value is worked out with: R=V/I current Where V = the 'left over' voltage from the subtraction and I = coil You will also need to work out the power rating for the resistor: P = V² / R Where V is the voltage and R is the resistance Again, for the above example, this works out to R = ( 40 - 24 ) / 67mA = 16 / 0.067 = 239 Ohms (220R should be fine) P = ( 16 x 16 ) / 220 = 1.16W So for an adequate safety margin, a 2 Watt resistor should be considered the minimum (5W would be better). To determine the transistor for Q3, add the supply voltage and the zener voltages to give the maximum collector to emitter voltage. In this case it is 40 + 48 = 88 Volts, and I would suggest that a transistor with a breakdown voltage of at least 100V be used to give some safety margin. The MJ350 (300V rated) will be suitable in nearly (if not) all applications, or you can use a MPSA92 lower current, but still has a 300V rating. Figure 2A - Alternative Back-EMF protection Figure 2A shows an alternative method you can use to damp the back-emf from the relay, but to implement it properly, access to an oscilloscope is helpful (if not essential). If the resistors have approximately the same resistance as the relay coils, the back-emf should (!) be limited to about the normal relay voltage, give or take 50% or so. In the tests I carried out (see Tests, below) using a 24V relay, the back-emf was limited to about -30V, which would be fine in most cases. This method is slightly cheaper than using zeners, but is less predictable. An additional alternative is to use a catch diode to the -ve power supply. A 1N4004 between the top of the relay string and the -ve amp supply will limit the back-emf to the voltage of the -ve supply, so for the example case this would be -40V. I expect that this would be quite acceptable, but have not tried it. Make sure that the diode is connected the right way around - the cathode goes to the top of the relays, and the anode to the negative supply. Muting Since we have all this new circuitry, it is most worthwhile to incorporate a muting function, so that when power is removed from the system, the relay will open to stop turn-off transients from being heard. Likewise, we will normally want to mute the system for about 2 seconds after power is applied to stop the turn-on transients as well. C1 and R1 in the circuit of Figure 2 provide the turn-on delay, by supplying current to the "Off" terminal as C1 charges. Once charged, the current falls to zero, and Q1 turns off, allowing Q2 and Q3 to turn on, thus energising the relays. (Note that this timer will not be reset if the power is turned off and back on again quickly, but since this is a procedure that should be avoided anyway, no provision has been made for it. ) To be able to do this effectively, we must have access to the AC from the power amp's transformer, or have the external unit controlled by the main power switch in the system. In some hi-fi installations, there will be a multiplicity of different units to turn on (and off) each time the system is used. I will leave it to the reader to decide which unit to use as the control, but would suggest that where a separate preamp is used, this could be an ideal controller for the entire system. It is unfortunate that hi-fi has not followed the sensible approach of a lot of computers, with a switched IEC connector on the back of the preamp to control power amps and other outboard devices. (I did this on my VP-103 valve preamp, and it is most useful :-) Figure 3 - Loss of AC Detector The power detector cannot rely on the DC supply, as this may take a considerable time to collapse. The common approach is to use a rectified but unsmoothed output from the transformer secondary. Because it is not smoothed, this disappears instantly when power is removed, and is ideal. Figure 3 shows the basic circuit, and this will remove relay drive within about 50ms of the power being turned off. We could make it faster than this, but there is little point. The circuit simply uses the current pulses to keep a capacitor discharged via Q1. When the pulses stop, the cap charges until the threshold voltage of the "Off" terminal is reached (0.65V), and the relays are turned off. After power is first applied, the timer circuit will activate the relays after about 4 seconds (typical). This can be increased if desired, by increasing the value of C1 in Figure 2. Tests I carried out some tests to see just how quickly the relays could be operated. The results were something of an eye-opener (and I knew about the added delay caused by a diode!). The relay I used was a small 24V coil unit, having a 730 Ohm coil and with substantial contacts (at least 10 Amps). With no back-emf protection, the relay opened the contacts in 1.2ms - this is much faster than I expected, but the back-emf went straight off the scale on my oscilloscope, and I would guess that the voltage was in excess of 500V. When a diode was added, the drop-out time dragged out to 7.2ms, which is a considerable increase, and of course there was no back-emf (Ok, there was 0.65V, but we can ignore that). Using the diode / resistor method described above, release time was 3.5ms, and the maximum back-emf was -30V, so this seems to be a suitable compromise. I was not able to test the zener method prior to publication, since I did not have the 24V zeners needed on hand. I would expect this scheme to be as good or better than the diode / resistor combination. The graphs below show the behaviour of the circuit with and without the resistor and diode. The estimated 500V or more is quite typical of all relays, which is why the diode is always included. This sort of voltage will destroy most transistors instantly. It is exactly the same process used in the standard "Kettering" ignition system used in cars, but without the secondary winding, or the "flyback" transformer used in the horizontal output section of a TV set. Figure 4 - Relay Voltages The trace labelled 'Contacts' is representative only, and is not to scale. The peak relay voltage (above left) exceeded my oscilloscope's input range (and I was too lazy to set up an external attenuator), and as shown is cut off at my measurement limit. I estimate that the voltage is greater than 500V. Note that the kink in the relay voltage curve is caused by the armature (the bit that moves) coming away from the relay pole piece, and reducing the inductance. This causes the stored magnetic charge to try to increase the voltage again, but it is absorbed by the resistance and dissipated quickly. The contacts open at the point where the previously closed magnetic field is opened as the armature moves away from the pole piece. As can be seen, this is 3.5ms after the relay supply is disconnected. These graphs are representative only, as different relays will have different characteristics. As noted above, I cannot predict what sort of relay you will be able to obtain, but the behaviour can be expected to be similar to that shown. All tests were conducted using a 24V relay, having 10A contacts. Upon contact closure, I also measured 2.5ms of contact bounce. Provided your amplifier is stable by the time the contacts close, this will be completely inaudible. References 1. D. Self - Muting Relays, Electronics World, Jul 1999 Отключение питания УМ при перегрузке. http://forum.datagor.ru/index.php?s=ac96b3288021f19e5633ac518d85a9bd&showtopic=7 273&st=21&start=21 Я в своих 250 Вт усях ставил реле РЭК28-2УХЛЧ паспорт КЩ4.569.007ТУ. На них было написано 220В, 2.5А . Там три переключающие группы, я их все параллелил. Ставил два реле, каждое на (+) и (-) питания. Советские, собаки, работали надежно. из справочника Допустимые режимы коммутации От 0.1 до 2.5 А от 12 до 220В (3*10^5) От 2.5 до 3А 12-240В (10^5) От 3.0 до 5А 12-220В (10^3) У меня такая защита стояла в 150 Ваттных усях. Выход на КТ818ГМ - КТ819ГМ. Напряжение питания +35В, -35В. И надежно защищала выходные транзисторы при КЗ в нагрузке... все успевало срабатывать! Рэн 34 хорошие рэле (даже контакты позолочены) то есть содинение хорошее но при разрыве цепи при пробое токи не детские .Для проф усилителя увы.А вопрос то про надёжный 200 вт проф ус. Ограничение тока вых транз лучше каждого транзистора.В проф усилителе самое то это при возникновении превышения токов выходных транз отключать нагрузку и мутировать сигнал.И тестирование сопротивления нагрузки во время включения как в ум Эстония Устройство защиты акустических систем. Универсальное, простое, надёжное http://datagor.ru/practice/loudspeakers/2627-universalnoe-ustroystvo-zaschity-akusticheskihsistem.html Категория: Практика » Проекты акустики Разместил: Chugunov, Существует множество вариантов зашиты АС от постоянного напряжения, щелчков при включении и выключении. Самые совершенные из них собраны на микроконтроллерах, управляют большим числом каналов, имеют дополнительные функции, например — датагорский кит Project-004 «Gatekeeper» (сервисный блок УМЗЧ, защита АС, включение одной кнопкой, управление вентиляторами и пр.) Удобны, функциональны и малогабаритны так же устройства на специализированных микросхемах. К сожалению, они не всегда доступны, их доставка по почте может занять много времени. Мне стало интересно — какая схема из дискретных элементов проста, дёшева, функциональна и нуждается в минимальной настройке. Наиболее отвечающую, на мой взгляд, этим требованиям схему, предлагаю вашему вниманию. Поскольку статья рассчитана в основном на начинающих радиолюбителей, я постараюсь подробно описывать даже простые вещи. Прототип А. Котова На первый взгляд, есть широкий выбор схем, но при ближайшем рассмотрении оказывается, что они имеют недостатки — много деталей, дефицитные детали, низкая чувствительность, необходимость настройки, работоспособность в узком диапазоне напряжений питания и т. п. Наиболее подходящей оказалась схема А. Котова. Устройство защиты акустических Но и она не лишена недостатков: — нет быстрого отключения АС при выключении усилителя, — строго определенное напряжение питания, — весь потребляемый ток протекает через светодиод, — режим работы с «оторванной базой» VT10. Кроме того, нет диаграммы напряжений и рекомендаций по настройке, нет рисунка печатной платы.систем. Усовершенствованная схема устройства защиты акустических систем Эти недостатки легко устранимы, вот доработанный мной вариант. Сохранена и продолжена нумерация деталей схемы А. Котова. Хочу отметить достоинства и особенности схемы: — задержка включения составляет оптимальные 4 секунды, определяется цепочкой R5C3, — цепь D5R8R9C4 при выключении из сети позволяет быстро обесточить реле и отключить АС, — после срабатывания защиты (отключении реле), конденсатор С3 разряжается быстро, а заряжается через резистор R5 медленно, поэтому не будет быстрых хаотичных переключений, — устройство работает в широком диапазоне напряжений, от напряжения срабатывания реле (и плюс 2 В) до 36 В (предел для TL431), — практически единственный резистор, требующий подбора — R7 служит для погашения избыточного для реле напряжения, номиналы остальных резисторов могут отличаться в несколько раз и не требуют замены в широком диапазоне напряжений питания, — все элементы, кроме TL431, работают при очень малых токах, что обеспечивает высокую надежность, — применение TL431 обеспечивает ключевой режим работы реле, — напряжения на конденсаторах кроме С4 очень малы, не более 2,5 В, что позволяет использовать емкости на низкие напряжения, поэтому я испытал вариант с одиночными полярными конденсаторами С1 и С2 на низкое напряжение, — годится любой светодиод (лучше яркий) т. к. ток через него задается резистором, — чувствительность очень высока (порядка 1 В), ее лучше загрубить, для этого на плате предусмотрены площадки под SMD резисторы (на схеме серым цветом). Собственный БП Если запитать УЗ от основного БП усилителя (как у А. Котова), при выключении сети, реле не отпустит сразу из-за больших емкостей БП и возможен щелчок/треск и т.п. Здесь же из-за очень малой ёмкости С4=1-4,7мкФ реле отпускает сразу. Можно взять ~ с трансформатора основного БП УНЧ, тогда возможно придется изменить делитель R8R9, чтобы снизить напряжение. Для «универсальности» данной схемы нужен блок питания с маломощным трансформатором с низким напряжением вторичной обмотки. Я использовал трансформатор ~230/12 В, мощностью 2 ВА. Блок питания выполнен на плате той же ширины, что и узел защиты, их удобно разместить на одной плате. Наличие отдельного блока питания позволяет использовать узел защиты с любым усилителем, в том числе с макетируемым, что особенно удобно т. к. АС подвергаются повышенной опасности именно в этом случае. Примененные детали и настройка Установлено реле «OMRON G2R-2» на 12VDC в прозрачном корпусе. Это сделано не случайно — хотя оно имеет габариты большие, чем у аналогичных в неразборном непрозрачном корпусе, его можно открывать и чистить контакты. Рекомендую при использовании неразборного реле, заранее осторожно распилить его корпус так, чтобы крышку с него можно было бы снимать и ставить на место. Особенно советую в случае б/у реле. Герметичные реле обычно меньше по размерам, поэтому легко устанавливаются с минимальными доработками печатной платы. Поскольку я расположил реле и зажимы с винтовыми клеммами достаточно плотно, при повторении платы надо убедиться в идентичности размеров зажимов, в противном случае чуть-чуть подкорректировать печатную плату. Можно обойтись без зажимов, это даже надежнее, но неудобно, особенно при настройке макетов усилителей. При отсутствии ошибок в монтаже и исправных деталях, схема начинает работать сразу, надо только рассчитать резистор ограничения тока через обмотку реле. Например, питание +18 В, реле на 12 В сопротивлением 280 Ом. Рабочий ток реле 12 В/280 Ом = 43 мА. Погасить надо 18В – 12В – 2В (падение напряжения на открытом TL431)= 4 Вольта. 4 В / 43 мА =100 Ом. Мощность резистора 43 мА х 4 В = 170 мВт, т. е. нужен резистор от 0,25 Вт и выше. На плате этот резистор «стоит», это сделано, чтобы можно было ставить резисторы разных габаритов и с запасом по мощности до 2 Вт. Все диоды, кроме шунтирующего обмотку реле, практически любые маломощные, надо только не забыть, что маркировка полоской на корпусе диодов КД522 и других советских, обратная импортной маркировке. При проблемах в работе, в первую очередь надо проверить правильность установки деталей, особенно диодов, транзисторов и TL431. Затем проверить качество паек (у меня плохо паялись выводы диодов), для этого надо хорошо промыть плату и осмотреть пайки с лупой (или с хорошим глазом). Затем проверить режимы по постоянному току, напряжения на базах транзисторов должны соответствовать указанным на схеме ± 0,1 В. Поскольку среди начинающих любителей есть страсть к гигантомании и усилителям мощностью в сотни ватт и с напряжением питания усилителей порядка ± 50 В, надо помнить, что чем больше мощность усилителя, тем большие токи протекают через контакты реле, при высоких напряжениях возрастает вероятность возникновения дуги между разомкнутыми контактами реле. В этом случае на данной плате может быть установлено любое реле с одной группой контактов, это реле будет промежуточным и управлять другим, более мощным реле с контактами, рассчитанными на бОльший ток и с увеличенным расстоянием между разомкнутыми контактами. К этому мощному реле можно будет подвести провода бОльшего сечения. Универсальность данного узла защиты со «своим» питанием и в том, что его можно подключить к выходам мостового (как правило, повышенной мощности) усилителя. Общий провод соединяют не с общим проводом усилителя, а с одним выходом усилителя, а один вход узла защиты со вторым выходом мостового усилителя. При установке узла защиты в готовую конструкцию, надобность в отдельном блоке питания отпадает (для обычного, не мостового усилителя). Итого Я сделал два экземпляра — с обычными резисторами и SMD, плата позволяет это сделать. Впечатления от устройств очень хорошие. Длину платы можно уменьшить на 1…2 см, особенно с резисторами SMD, но я предпочитаю широкие дорожки, позволяющие неоднократно перепаивать детали и прощающие смещения при сверлении отверстий; достаточные промежутки между дорожками. Устройство защиты акустических систем. Универсальное, простое, надёжное Не надо забывать, что подобное устройство защищает только НЧ-головки от постоянных напряжений и все головки от переходных процессов в усилителе, в том числе при выходе усилителей из строя и не защищает ВЧ-головки при перегрузках и возбуждении усилителей. Вместе с тем, данное схемное решение позволяет подключать датчики перегрева, ограничения (клиппирования), возбуждения для сохранности всех головок АС. Кроме того (что используется в ряде усилителей) можно управлять подключением к выходу усилителя одной или несколькими пар АС с помощью переключателя на лицевой панели усилителя, при этом не надо пропускать сильноточные сигнальные цепи через данный переключатель.

